USER GUIDE > TRANSACTIONS
Being financially informed is what allows you to be successful with money. Knowing what is going on with your money allows you to set realistic objectives and create long-term financial adjustments. However, tracking your every transaction may need too much effort and time, especially if you have multiple accounts.
The Transaction Summary depicts your money movement. If you have linked your accounts with MoneyPatrol, you will be able to examine everything in Transaction summary instead of going into multiple accounts to track your income and expenses. This makes keeping track of and managing your funds easier and more convenient. This also allows you to organize and categorize each transaction, making it easier to find and view transactions.
When you scroll down to the bottom of the Transaction window, you will see page numbers where you may click to view prior to most current transactions on your accounts.
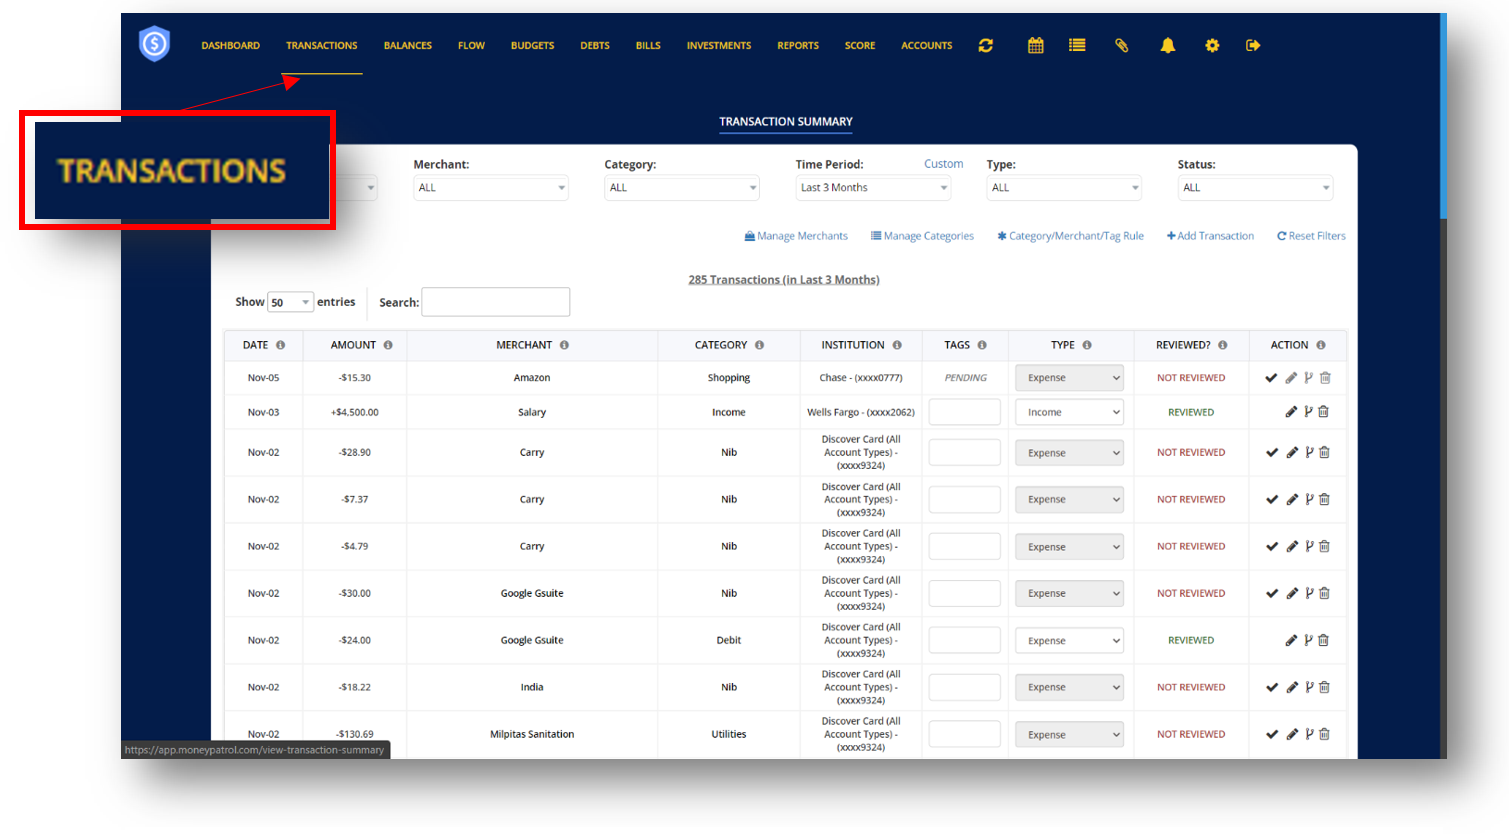

TABLE OF CONTENTS
a. Transaction Filters
b. Tags
c. How to Edit Transaction
d. How to Change Merchant and Category
e. How to Split Transaction
f. How to Manage Merchants
g. How to Manage Categories
h. How to Add Transaction
i. Category/ Marchant / Tag Rule
How to Add Category Rule
How to Add Merchant Rule
How to Add Tag Rule
How to Edit Category / Merchant Rule
How to Edit Tag Rule
TRANSACTION FILTERS
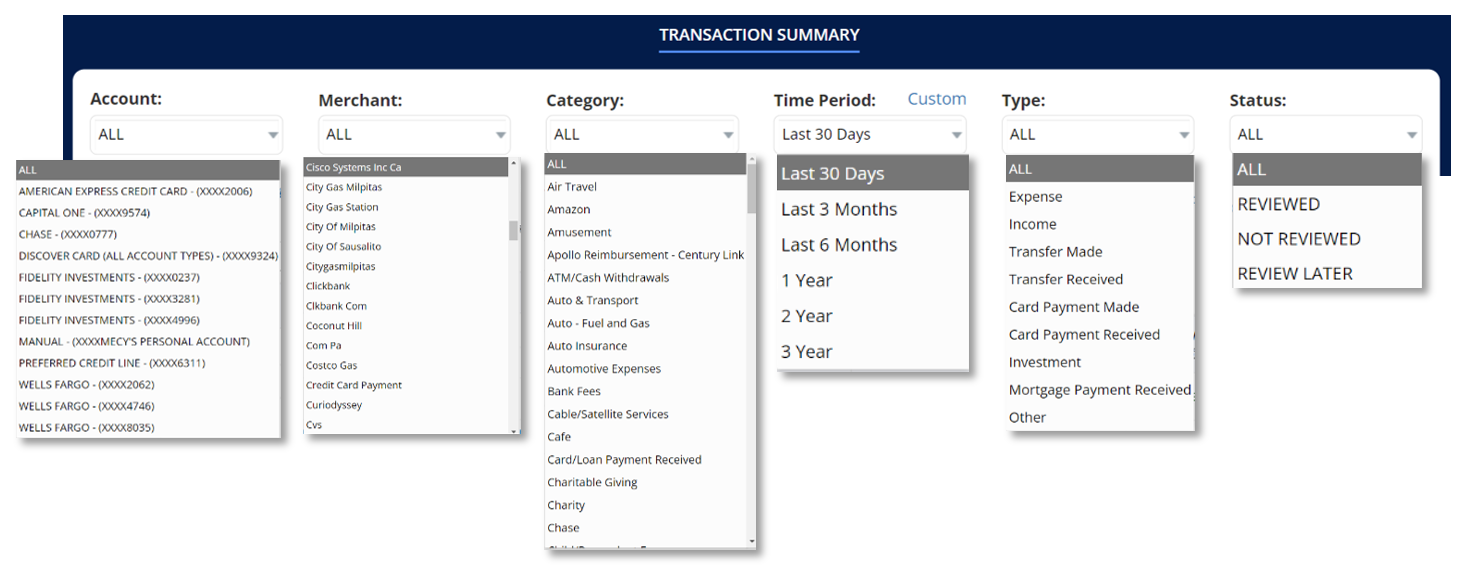
Transaction filters are used to narrow and personalize your search results in order to find the specific transactions that you are looking for.
Simply click on the drop-down button under the filter’s name, and a drop-down menu will appear, allowing you to selectively view the transactions you need while excluding those you don’t.
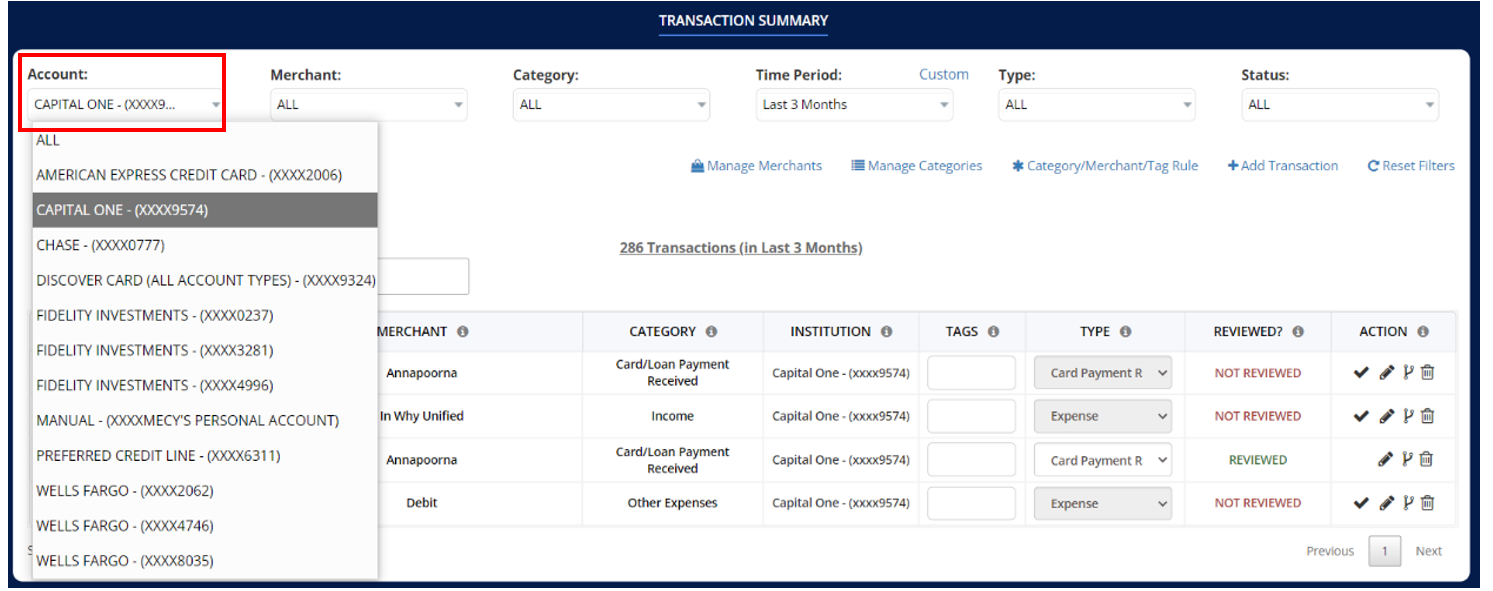
ACCOUNT
One alternative is to search for specific transactions based on the accounts you’ve linked to Money Patrol. For example, you could want to view all of your Capital One transactions. Simply choose Capital One from the drop-down menu under “Account,” and you’ll be able to see all of your transactions associated with this account.
MERCHANT
This is where a certain transaction took place. This filter allows you to only view the transactions associated with the merchant you’re searching for.
CATEGORY
This filter limits the display of transactions to those that belong to a certain grouping. For example, if you select a category such as “Groceries,” it will display all of your transactions from merchants that come under the category “Groceries.”
TYPE
There are several types of transactions. This filter makes it easier to narrow down the type of transactions you’re looking for. You can pick from the following types of transactions:
- INCOME- These are transactions where money is received more likely on a regular basis.
- EXPENSE- These are financial transactions in which money is spent on something.
- TRANSFER MADE- These are transactions made when money is transferred from your bank account to another.
- TRANSFER RECEIVED- These are transactions made when money is received from another bank account to your bank account.
- CARD PAYMENT MADE- These are transactions of your card payments.
- CARD PAYMENT RECEIVED- These are transactions of your card payments.
- INVESTMENT- These investment transactions made on your accounts.
- MORTGAGE PAYMENT RECEIVED- These are transactions for payment for mortgages.
STATUS
- REVIEWED- This will display the transactions that was marked as Reviewed.
- NOT REVIEWED- This will display the transactions you haven’t opened and marked as “Not Reviewed”
- REVIEWED LATER- This will display the transactions you haven’t opened and wanted to view later on.
TIME PERIOD
The time period allows you to filter out the dates of transactions you want to view.
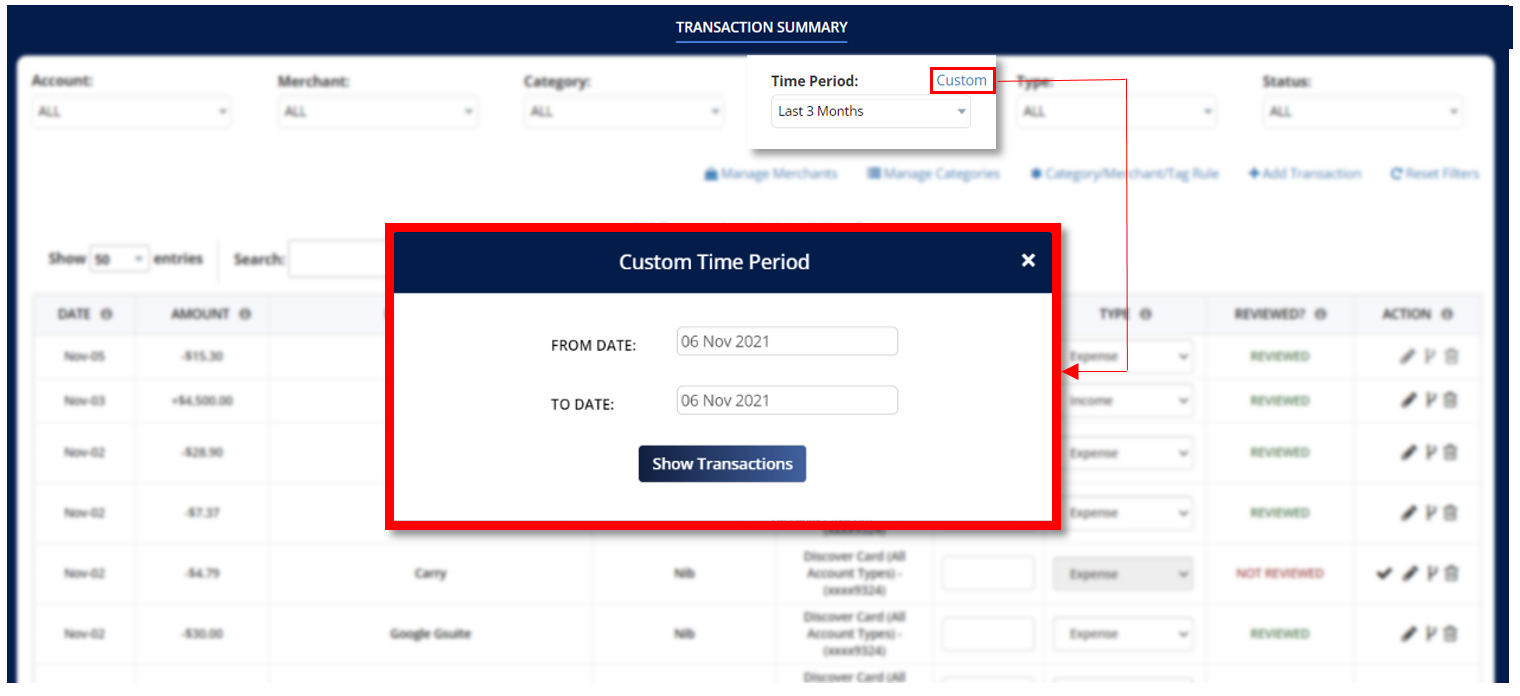
You may also choose the time period for which you wish to view a transaction. Simply click on “Custom” next to Time Period, and a pop-up window will open, allowing you to specify a start and end date for the transactions you’re looking for. After setting the dates, click “Show Transactions,” and any transactions that fall within those dates will be displayed.
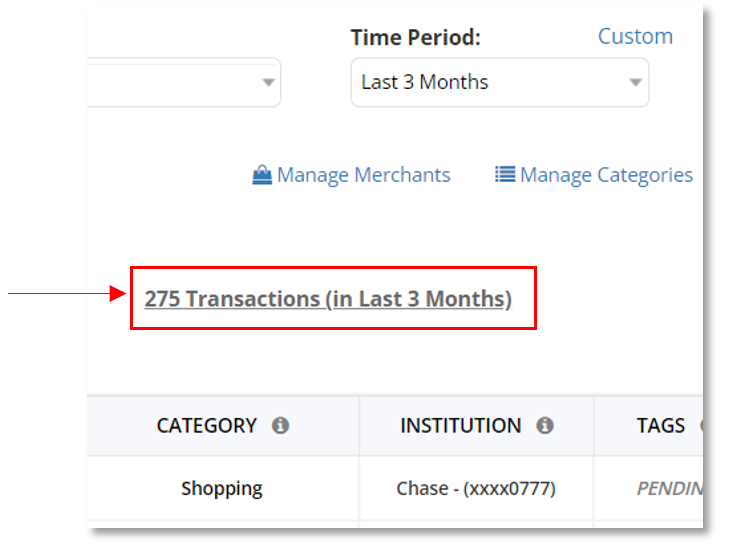
When you modify the Time Period, the number displayed in this entry will vary based on the number of transactions that fall within the time period you selected.
RESET FILTERS
By selecting the “Reset Filters” button, you may automatically reset the filters you selected when browsing for your transactions.

SEARCH BAR
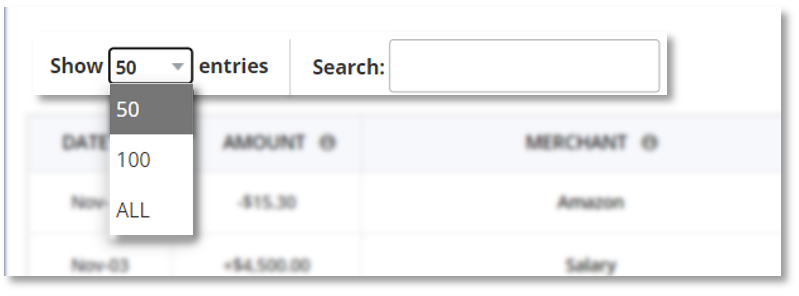
You may also search for a specific transaction using the search bar. Simply enter the keyword of the transaction you are looking for, and it will display the transactions that match the criteria. Take notice that the search bar will also reflect the filters you choose before entering in the search bar.
For example, you may use the Search Bar to search for a merchant’s name, but you only want to view transactions that occurred on a specific date. Simply type the merchant’s name into the Search Bar and set the Time Period to the desired transaction date. The transactions will then be displayed under the merchant name you specified, but filtered out based on the date you selected. This applies to the other filters as well, however if you don’t want this to happen, simply click reset filters to delete any previously set filters.
TAGS
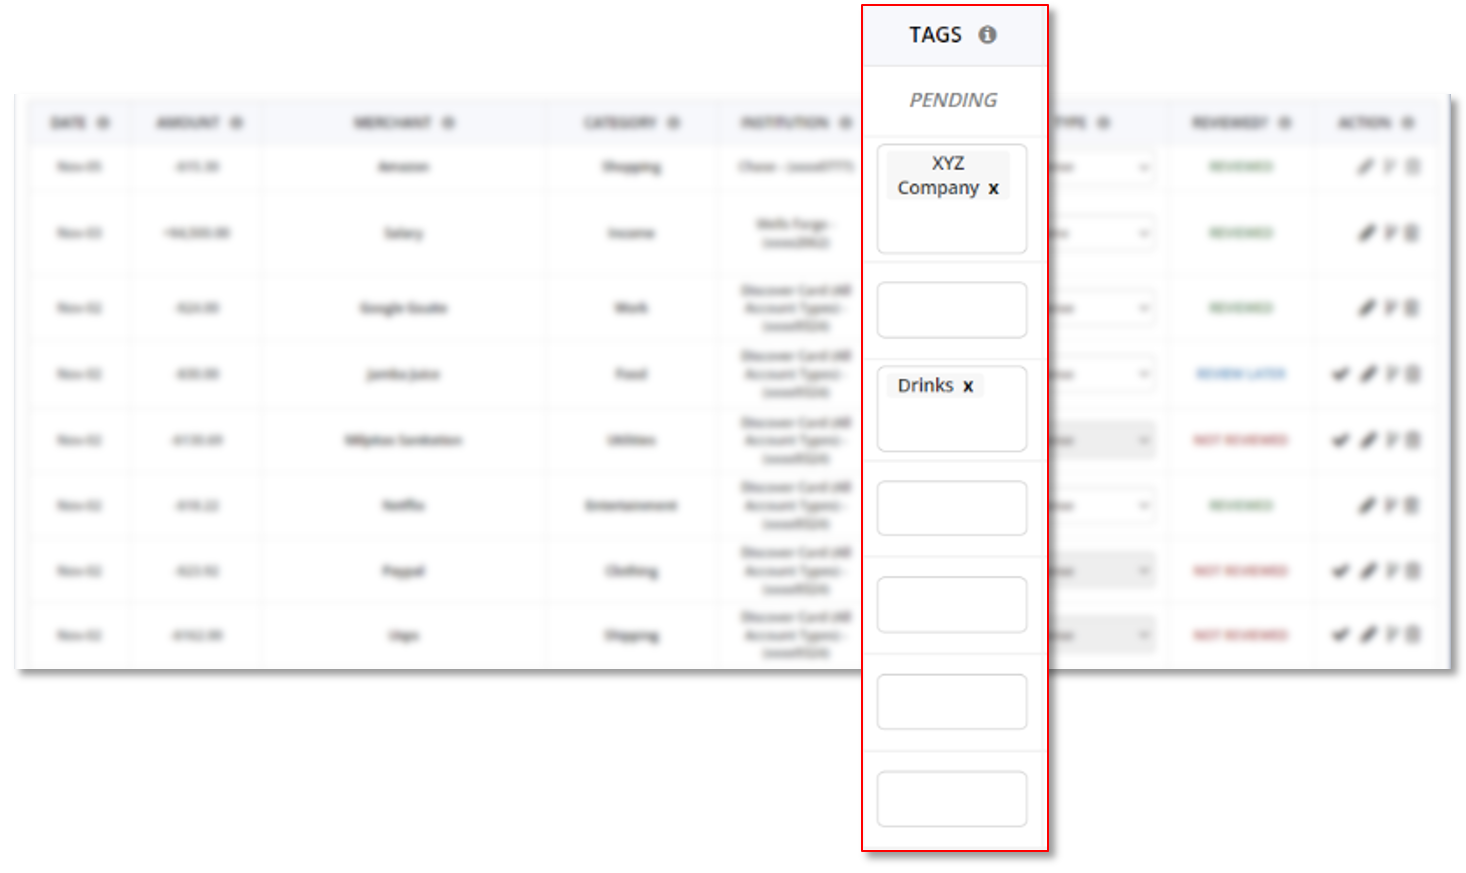
Tags is a column that allows you to create custom groupings for a transaction. For example, if you want to keep track of your vacation expenses, you may add special tags to the corresponding transactions. You can include one or more tags. Once you’ve entered the tag name, hit Enter to save it. You may also utilize the top navigation bar’s Reports section to produce reports based on your Tags.
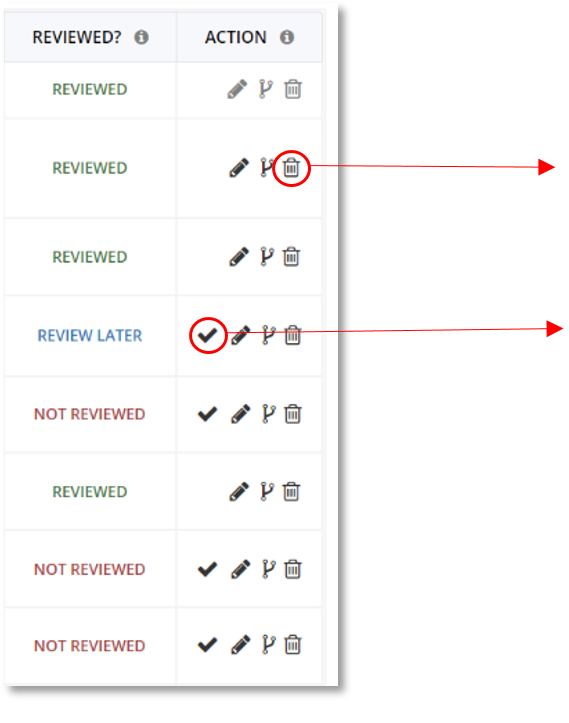
To delete a specific transaction, click the trash bin icon.
To quickly indicate a transaction as “Reviewed,” click on the checkmark.
HOW TO EDIT TRANSACTION
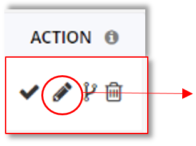
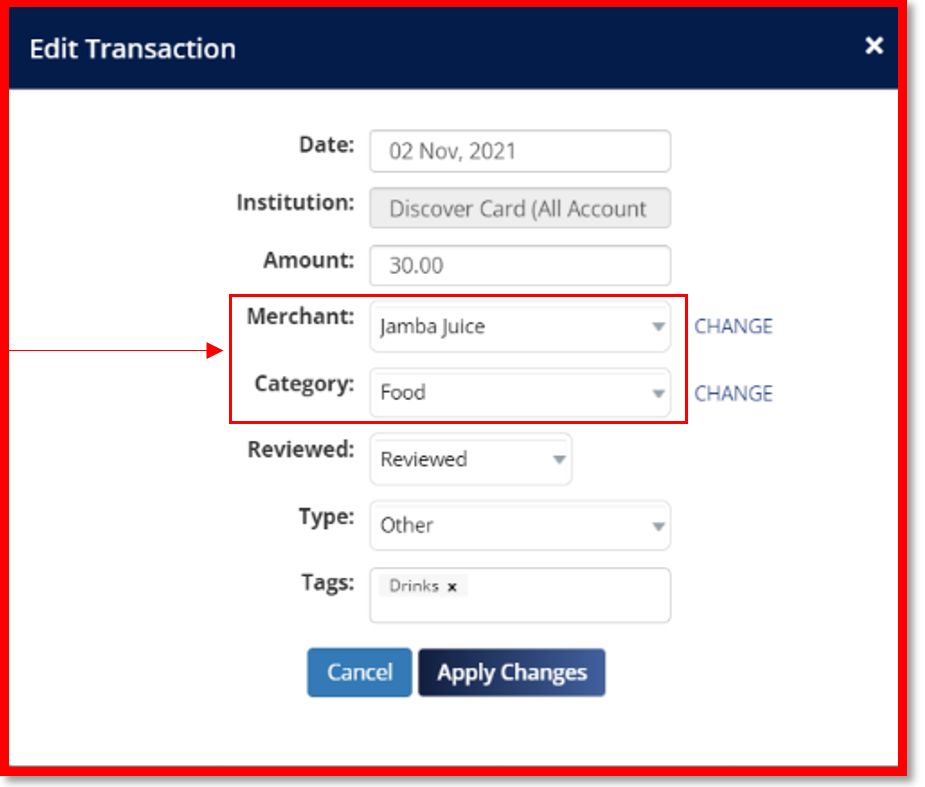
You may edit your transactions by clicking on the pencil icon. A pop-up window will appear, allowing you to make changes to a single transaction.
To change the merchant for a certain transaction, click the drop-down button next to “Merchant.” If you want to alter the category it belongs to, do the same thing with “Category.”
HOW TO CHANGE MERCHANT AND CATEGORY
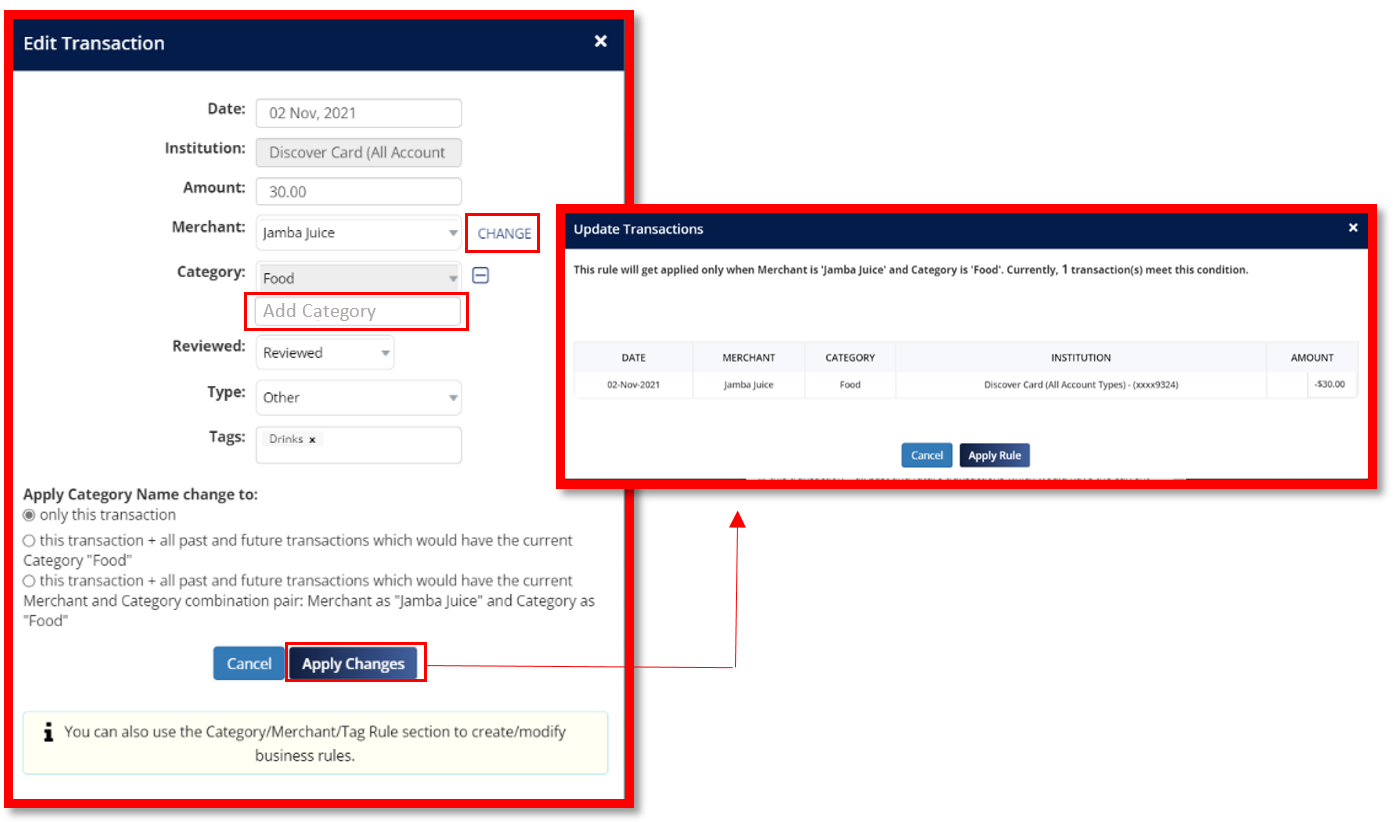
- Click “Change”. The word “Change will be replaced by a minus icon and empty bar will appear below the previous category name.
- Enter the new Category Name.
- Following the addition of a new Merchant or category. You will be given the following options for how to apply these changes:
- Only this transaction
- This transaction + all past and future transactions which would have the current Category Name
- This transaction + all past and future transactions which would have the current Merchant and Category name combination pair.
- Click “Apply Changes”.
- A pop-up window will appear to confirm if you want to continue with these changes.
- Click “Apply Rule”
HOW TO SPLIT A TRANSACTION
The Split Transaction icon allows you to separate and identify which transactions are for which by entering tags for each transaction.
For example, you want to separate your transaction base on the items you bought from Walmart to Food and Clothing.
- Click the Split Transaction icon.
- Enter the amount and the tag for the first transaction.
- Enter the amount and the tag for the first transaction.
- Click Split.
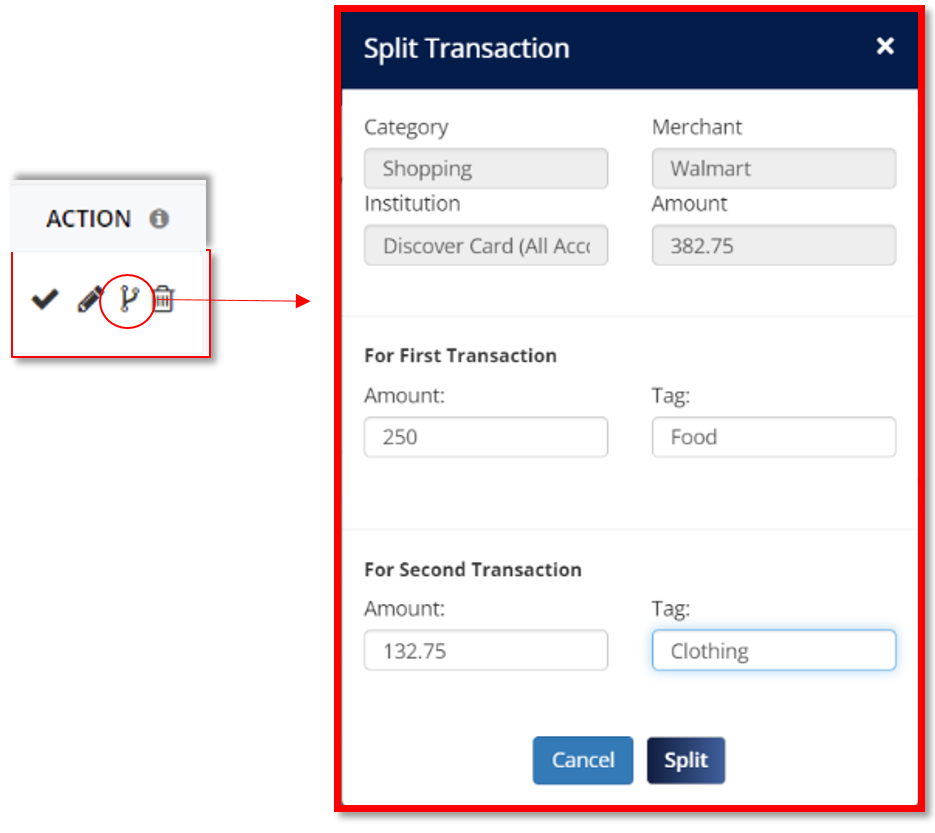
Your Split Transaction will now appear like this.

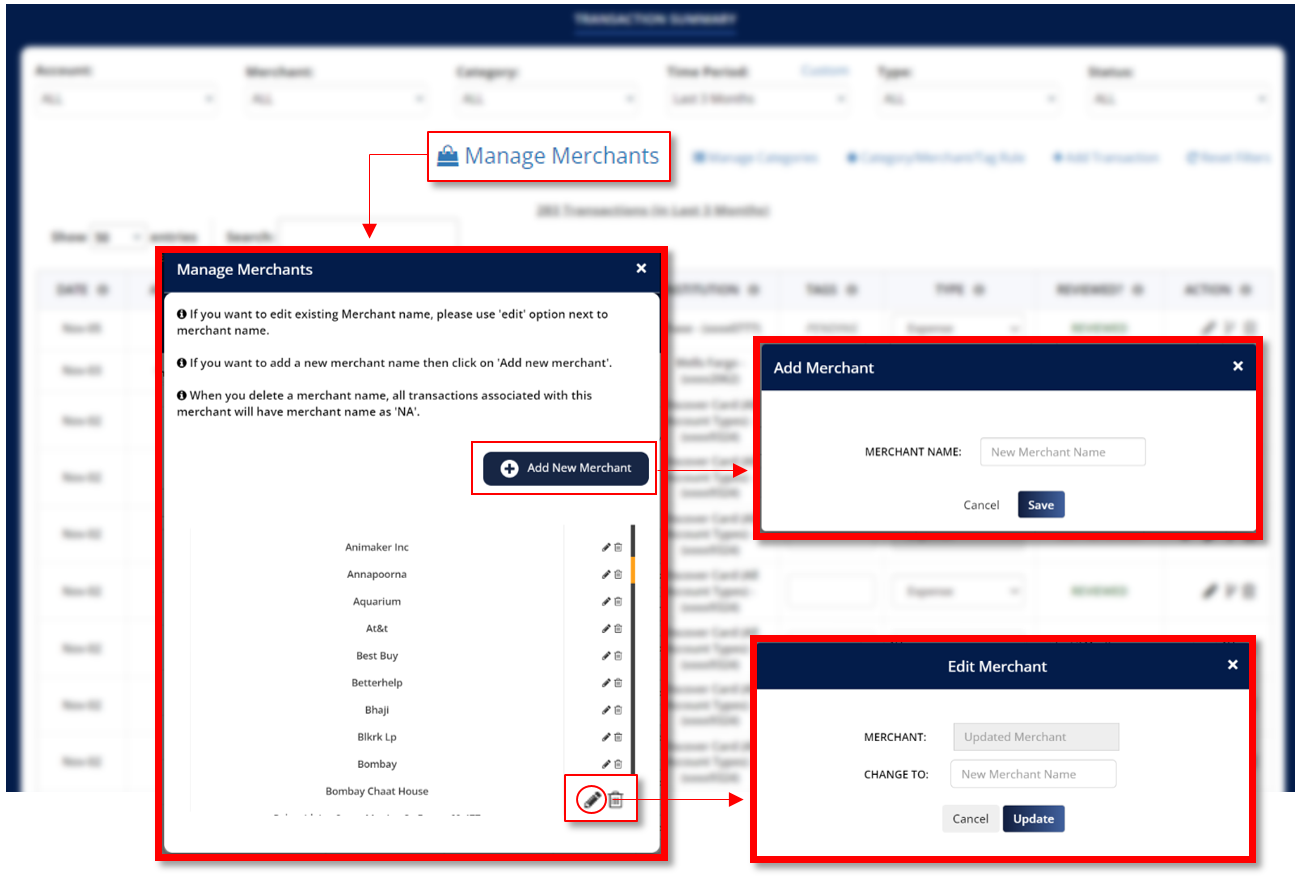
HOW TO MANAGE MERCHANTS
- If you wish to change an existing Merchant name, click the pencil icon next to the merchant name. Enter the new merchant name on the op-up window. Click “Update” to apply this change.
- Click on “Add New Merchant” if you wish to add a new merchant name. Enter the new merchant name on the pop-up window and then click “Save” to apply this change.
- Click on the trash bin icon to delete a Merchant
NOTE: When a merchant name is deleted, all transactions linked with that merchant will have the merchant name ‘NA’.
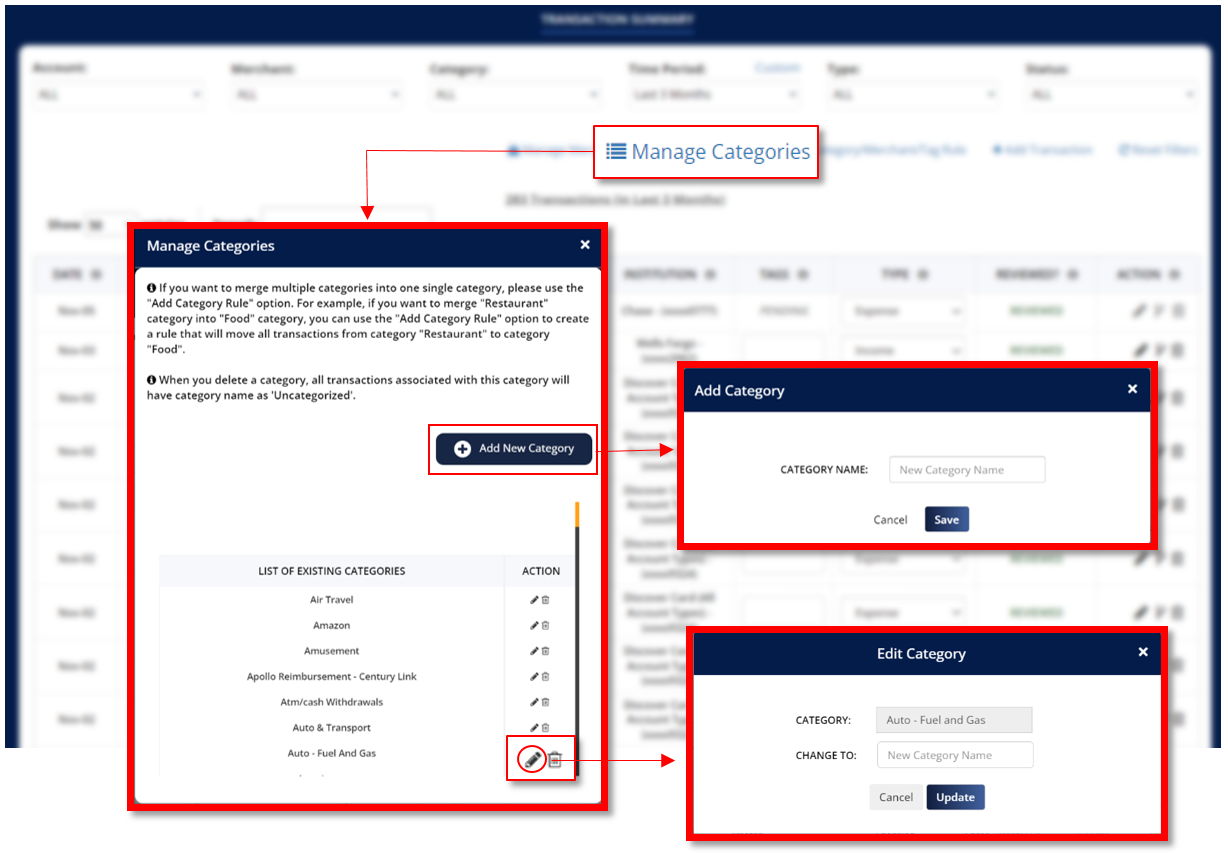
HOW TO MANAGE CATEGORIES
- If you wish to change an existing Category name, click the pencil icon next to the category name. Enter the new category name on the op-up window. Click “Update” to apply this change.
- Click on “Add New Category” if you wish to add a new category name. Enter the new category name on the pop-up window and then click “Save” to apply this change.
- Click on the trash bin icon to delete a Category.
NOTE: When a category name is deleted, all transactions linked with that category will have the category name ‘NA’.
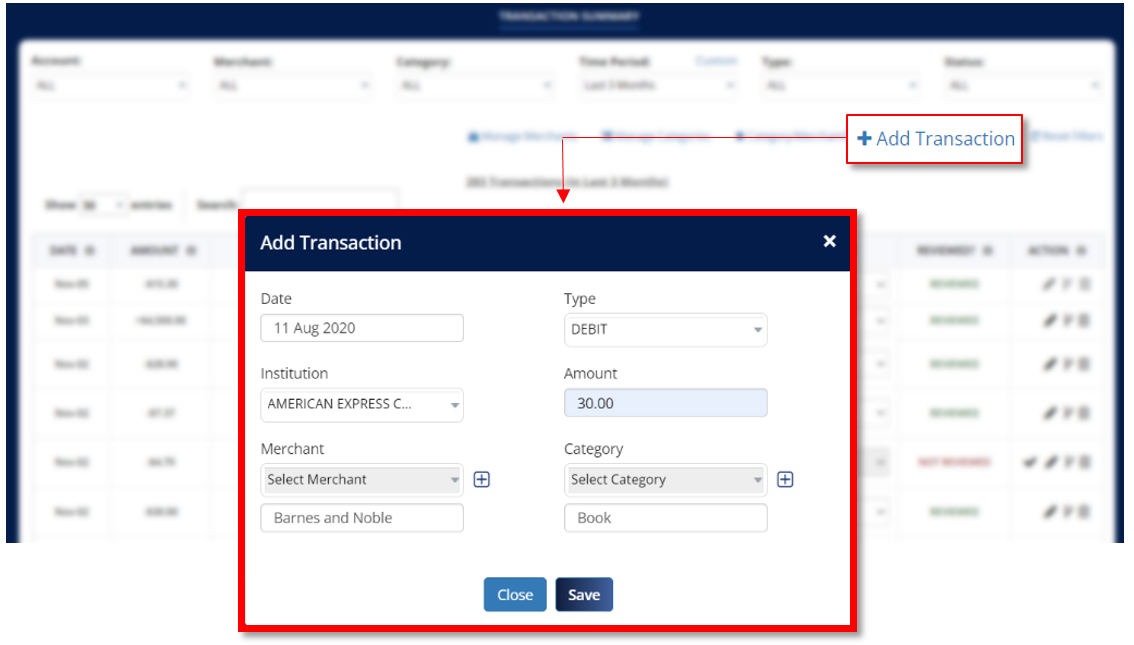
HOW TO ADD TRANSACTION
- Click “Add Transaction”.
- On the pop-up window, enter the transaction details such as the Date, type, Institution, Amount, Merchant and the Category.
- Click on the drop-down button to select a Marchant and Category.
- To add a new Merchant and Category, click on the plus sign icon and then enter the new Merchant and Category.
- Click “Save” to add this transaction.
NOTE: Transactions are listed in the Transaction Summary from the most recent to the most prior dates. Transactions added on a later date will not appear on the first page of the transaction summary. To locate this transaction, go to the next pages or utilize the “Time Period” filter and the search bar.

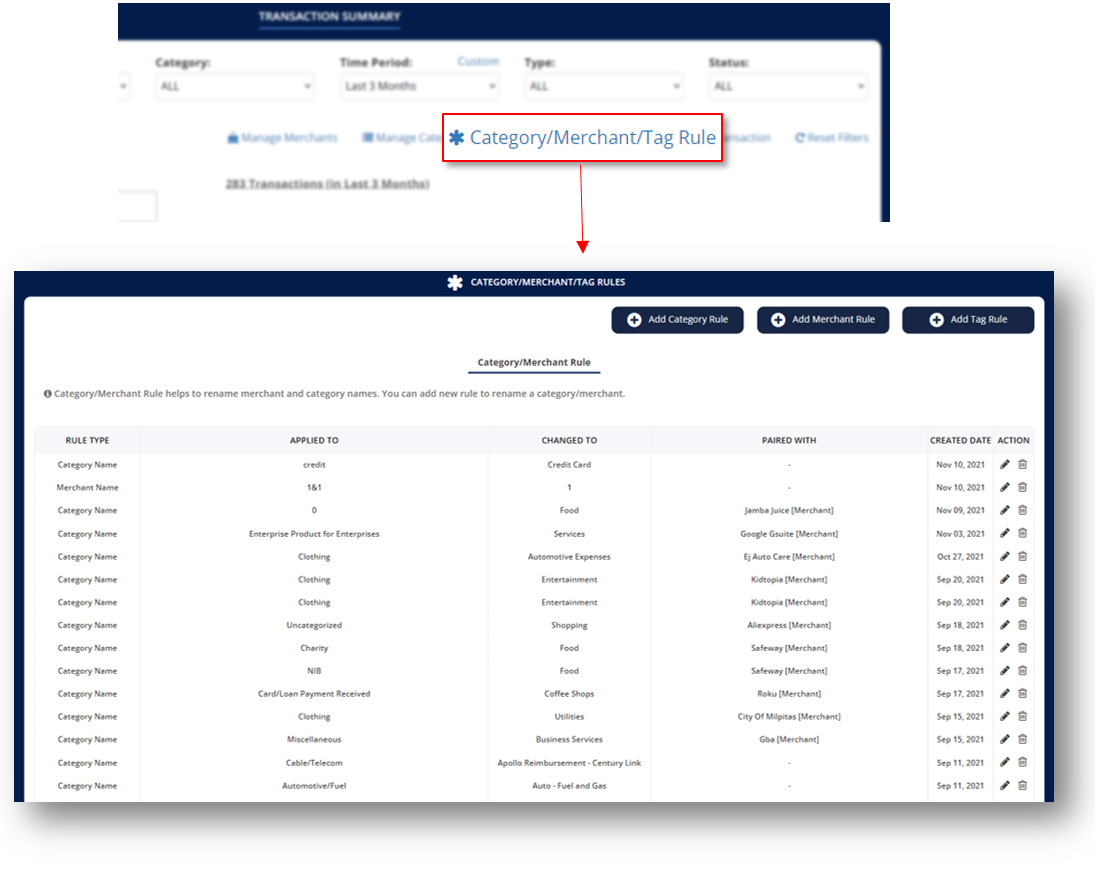
CATEGORY/ MERCHANT/ TAG RULE
By clicking “Category/Merchant/Tag Rule,” you will be sent to a new window where you can modify or change the names of your Merchants and Categories. These changes will be applied automatically to your transactions associated with these Merchants, Categories, and Tags.
HOW TO ADD CATEGORY RULE
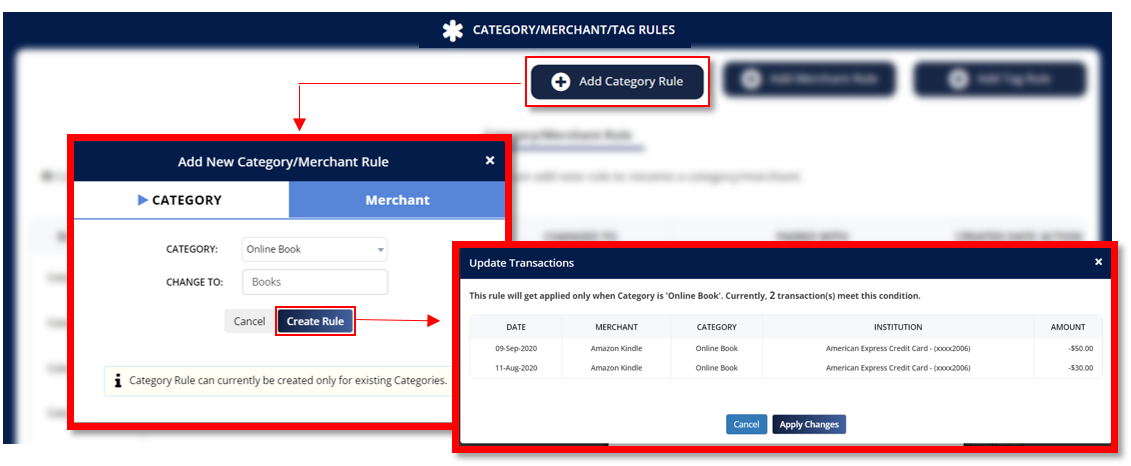
Category Rule enables you to change the name of an existing Category.
- Click “Add Category Rule”.
- On the pop-up window, select an existing category you want to change.
- Enter the new Category Name.
- Click “Create Rule”.
- Another pop-up window will appear showing the transactions associated to the previous category name. This is a confirmation if you still want to continue applying these changes to these transactions.
- Click “Apply Changes” to apply rule.
HOW TO ADD MERCHANT RULE
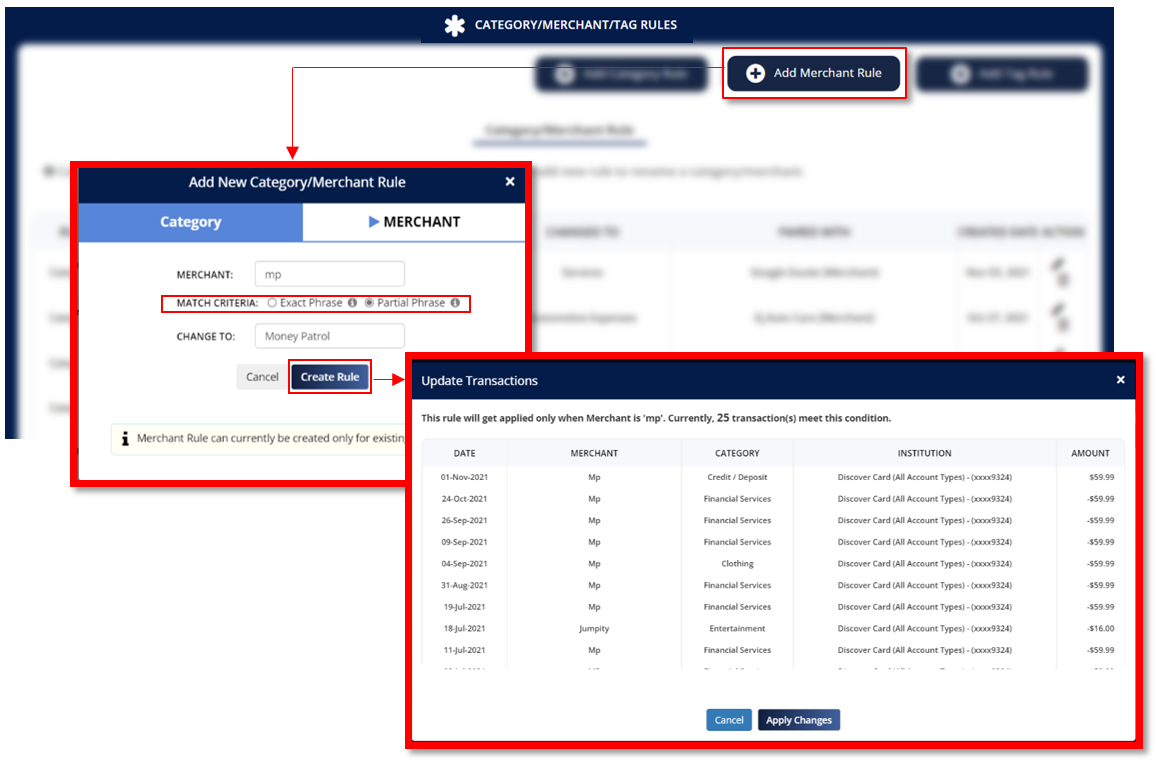
Merchant Rule enables you to change the name of an existing Merchant.
- Click “Add Merchant Rule”.
- On the pop-up window, enter an existing merchant you want to change.
- Select a Match Criteria for the existing merchant. This will help you search the associated transactions for this merchant.
- Exact Phrase – This option will apply the rule to the transactions with the exact name of the Merchant.
- Partial Phrase- This option will apply the rule to the transactions with the partial name of the Merchant.
- Enter the new Merchant Name.
- Click “Create Rule”.
- Another pop-up window will appear showing the transactions associated to the previous merchant name. This is a confirmation if you still want to continue applying these changes to the displayed transactions.
- Click “Apply Changes” to apply rule.
HOW TO ADD TAG RULE
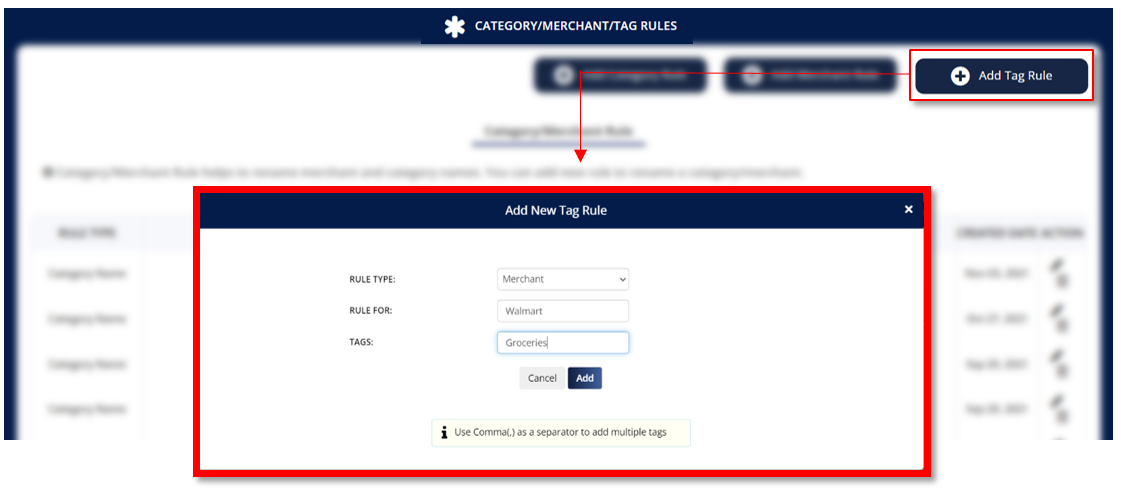
- Click “Add Tag Rule”.
- On the pop-up window, select the Rule Type.
- Enter a Merchant name if you selected Merchant as the Rule Type and a Category name if you selected Category as the Rule Type.
- Enter the Tags. Use a comma (,) as a separator if you want to add multiple tags.
- Click “Add” to apply the rule.
Scroll all the way down to view all Tag Rules.

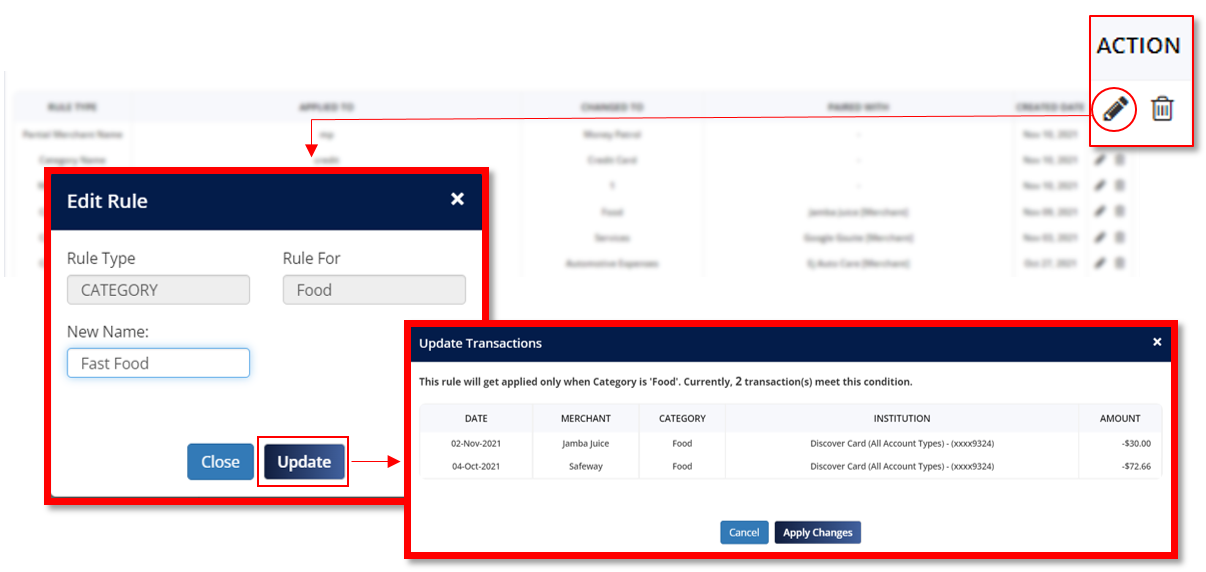
HOW TO EDIT CATEGORY/MERCHANT RULE
- Click on the pencil icon to edit an existing rule.
- In the pop-up window, you can then enter the new name for a certain category if it was a Category Rule and a new merchant name if it was a Merchant Rule.
- Click “Update”.
- A new pop-up window will appear, displaying the associated transactions for the Category or Merchant Rule you selected.
- Click “Apply Changes”.
HOW TO EDIT TAG RULE
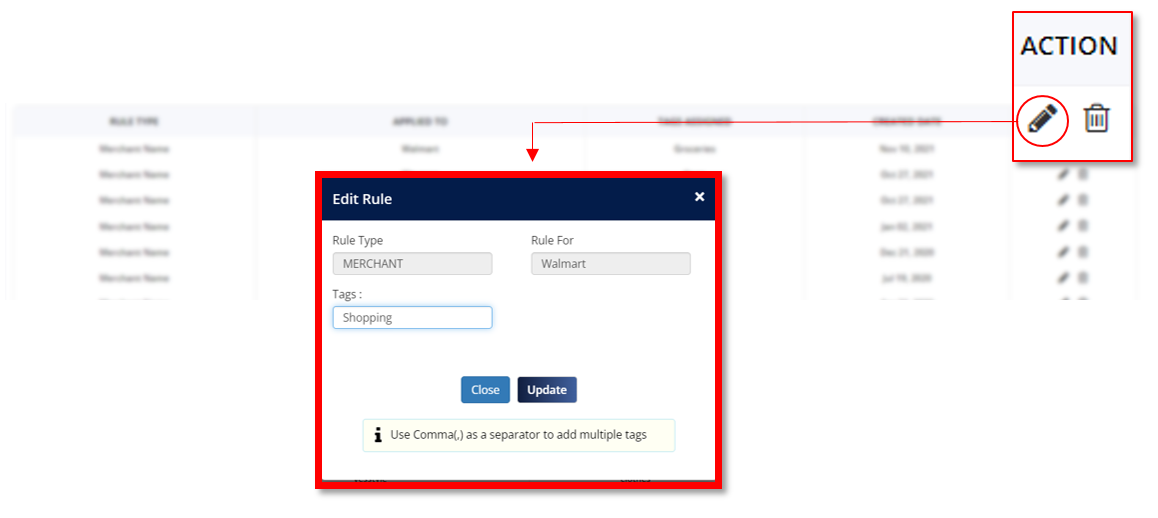
- Click on the pencil icon to edit an existing rule.
- In the pop-up window, rename or add a new tags on the Tag Rule.
- Click “Update” to apply changes.
